Installing Drupal in Ubuntu
We can create our own blogs, websites using a very famous Content Management Systems (CMS). One such CMS is Drupal.
I assume you have XAMPP installed in your pc. If not please check out my other blog on how to install lampp server in ubuntu.
Before starting download your latest copy of Drupal here.
Pre-Installation:
By now you would have downloaded this file drupal-7.21.tar.gz
Install Drupal:
Lets install Drupal by extracting its content to "/opt/lampp/htdocs"
1.) Locate the file in your local system (mine was in the Downloads folder).
2.) Now open the terminal and type the following command.
- cd Downloads (if its in Downloads folder)
- sudo tar xvfz drupal-7.21.tar.gz -C /opt/lampp/htdocs
3.) Open your terminal and type the following command.
- sudo mv /opt/lampp/htdocs/drupal-7.21 /opt/lampp/htdocs/drupal
Now lets test Drupal whether its installed properly or not.
1.) Open your browser.
2.) Type the following url : http://localhost/drupal
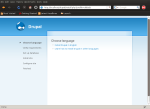
You should see this page:
Create a database now:
Now in this section we are going to create a database to save our data:
1.) Open your browser.
2.) Type the following url: http://localhost/phpmyadmin
3.) Click on databases section and type your database name (my db name is drupaldb) and then click Create Database button.
4.) Go to privileges and create a new user for this newly created database. Remember the username and password.
Configuring Drupal:
After installing Drupal and creating a database, now we can go ahead and configure Drupal.
1.) Click the Install in English language button.
2.) You will likely encounter with this page.
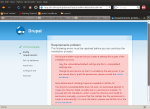
3.) If you encounter with any errors then Open your terminal and type the following command. Here we are just making a copy og default.setting.php and renamed it to settings.php
- sudo cp /opt/lampp/htdocs/drupal/sites/default/default.settings.php /opt/lampp/htdocs/drupal/sites/default/settings.php
5.) Open your terminal and type the following command.
- cd /opt/lampp/htdocs/drupal/sites
- sudo chmod a+w default
- sudo chmod a+w default/settings.php
- sudo vim /opt/lampp/etc/php.ini
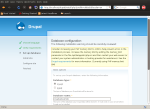
8.) That should have solved all the problems! Okay, now you should be able to see the Database configuration page in your browser:
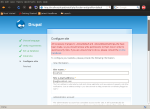
9.) Notice that I have entered a name for my database, the same name I’d used earlier. Make sure you do the same. Once you clicked the Save and continue button on the Set up database page, you will be directed to the Configure site page, like the picture below:
10.) For security purposes, it tells you to remove write permissions to the settings.php file. Let’s do that: Type the following command in your terminal.
- sudo chmod a-w /opt/lampp/htdocs/drupal/sites/default/settings.php
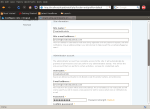
11.) Finally! You are now ready to enter some important informations for your new web site. Fill out the the required information for the Site information and Administration account sections. Make sure you remember the username and password you’ve entered!
12.) Once all the informations are filled out, click the Save and continue button. Voila! Give yourself a pat on the back! You have just completed installing Drupal on your computer!
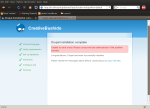
13.) Now when you saved and continued you will presented with the home screen of your website.
NOTE: This will be saved in your localhost and once you think that its perfect then you can host your website live.
That's all for today folks hope this blog helps. Cheers!